Thursday, March 31, 2011

Mostaccioli

Probably the recipe I get the most requests (other than the Molten Lava Cakes) for is mostaccioli. Try saying it. It is just a fun word to say!

This is one of my tried and true recipes. It is easy to make, requires few ingredients, and is a good meal you can make ahead of time. If I am taking a meal to a friend in need, this is a very easy one to make and let them bake when they are ready.

The origins of this recipe: One sweet family, the "H" family brought this meal to me during Teacher Appreciation week one year, ready to bake for dinner. It was love at first bite. Now it is a regular on our family meal rotation.

Here is the recipe:

Mostaccioli

One bag of mostaccioli...look in the pasta section. It is there. I promise. You have probably never noticed it before (or I hadn't). I am showing you a bag of it but not promoting a certain brand. In fact, we typically buy the store brand but didn't this time for whatever reason. The noodles look a lot like penne to me.1 (or more) pounds of ground beef
1 jar of spaghetti sauce
1 jar of alfredo sauce (I use the light)
1 bag of shredded cheese (cheddar or mozzarella)

Directions:
Boil mostaccioli according to package directions. Okay, I don't really read those directions. It takes about 8 minutes I think. I just check a noodle every now and then. When it is done, drain it. Stir in alfredo sauce.

Brown the ground beef. Drain. Mix in spaghetti sauce.

Layer in a casserole dish (9 x 13): noodles on bottom, meat on top. If you put the noodles on top, then they tend to dry out.

Bake at 350 for 30 minutes. At about the 20 minute mark, take out and top with cheese. Finish baking.

Enjoy!

Here is a picture which does not nearly do it justice. I use light cheese so it doesn't melt as well as the good stuff. :)

Happy cooking!
Reba

Tuesday, March 29, 2011

Peanut Butter Dip

I really want to give credit to whoever I got this recipe from but honestly, I cannot remember! I know I have had this dip at baby showers, but it has become such a favorite, I like to make it and just eat it for a meal sometimes (with apples). My favorite part? 4 ingredients, maybe five minutes to "assemble", and it is very yummy. I hate to say it, but I rarely eat apples without it anymore.

So, here is the big recipe.

Peanut Butter Dip

1 cup peanut butter (I usually use the low fat but today I used the natural which is not low fat but is very good)
1 cup brown sugar
1 cup cream cheese (I usually use light; the whipped is easier but the regular cream cheese works too)
1/4 cup milk

*I often make just a portion of it because it does make quite a bit.

Mix all four ingredients together. I have used both spoon and mixer. I prefer the mixer, just because to me it blends better.

Refrigerate any leftovers.

It is a good source of protein, right? :)


I don't usually make it this pretty but I was in a silly mood tonight. :)

Enjoy!
Reba

Monday, March 28, 2011

Chicken Enchilada Soup

I got this recipe from an intern a few (or more :) years ago. Since then, it has become a family favorite.

Chicken Enchilada Soup

1 pound chicken breasts/tenderloins (I do use a little more than a pound...we like meat)

4 cans cream of chicken soup

1 carton half and half (I use the pint)

1 pint milk

1 pound Mexican Velveeta, cut into smaller pieces

1 can Rotel

salt and chili powder to taste

Boil the chicken breasts then cut into small pieces.

Add all ingredients to a crockpot. (Like I have said, we use the crockpot liners...saves SO much time in clean up) Stir often and cook until heated through. I often leave it on high for a couple of hours. Really, this could be ready REALLY fast if it weren't for the Velveeta...that takes a while to melt. And melting it in the microwave before adding it to the soup does NOT work. Trust me.

We serve over Fritos.

Other Confessions: I try to be careful with calories/fat. So I use the 99% fat free cream of chicken soup, 1 pound 2% Velveeta (I cannot get it like that in Mexican, so I use plain), and the FAT FREE half and half. I am sure it is a little better with all of the fat, but I will say we love my reduced fat version. Then I don't feel so bad when I pour it over a handful of Fritos!

This recipe is pretty easy and really yummy on a cool night (which it is tonight here). It is also quite tasty reheated. I only have one child who isn't crazy about this...it is the tomatoes that she protests. Otherwise, they (including one very picky eater) eat it up.

Enjoy!
Reba

Thursday, March 24, 2011

Poppy Seed Chicken

I know that this meal/casserole is probably one most people already have a recipe for...it is a great meal for a potluck. But I wanted to share just in case you don't have your own version. I don't make it very often but when I do, they eat it up. The WHOLE family.

Poppy Seed Chicken

4 boneless chicken breasts (I use tenderloins and probably do a bit more just to make sure we have enough)
1 can cream of mushroom soup (I do use the low fat)
8 oz. sour cream (again, I use low fat)
1 cup crushed Ritz crackers (I just use a sleeve, crush them while in the sleeve, then pour onto the casserole)
1/2 stick butter
1 1/2 tsp poppy seed (I don't measure, I just sprinkle what I want)

First, boil the chicken until cooked through. Then chop. I just take the chicken out of the pot and put it in my casserole dish. I use kitchen scissors to cut it into small pieces right there in the dish.

Mix the soup and the sour cream. Heat together, then pour over the top. I honestly don't always heat it first. It is going in the oven anyway...

Next, pour the Ritz cracker crumbs over the top of the casserole.

Melt the butter and pour over the top. Then add the poppy seeds. Okay, I think I usually add the poppy seeds before the butter. I don't think it matters. Either way, don't take a random drug test in the next few days after eating poppy seeds!

Bake for 35-40 minutes at 350.

Enjoy!

We usually have wild rice, bread, and sometimes a salad with it.

Hunter insisted on "plating" his so I could have it for my photo collection. I think we probably watch too many cooking shows around here. :)
I really should make this more often. It is yummy. It is easy to make. (You can make it ahead of time and refrigerate until cooking time) And my family loves it. What more could I ask for?

Happy cooking!
Reba

Wednesday, March 23, 2011

Cholesterol Raising Hashbrowns


I really think there could be a better name for these, but this is the title my mom gave it when she gave me the recipe. Trust me, they taste much better than the name sounds. :)

These are a family favorite (for those who eat potatoes). We typically only have them if we grill out but really they would go with a lot of dishes. I could just eat these for a meal alone though I try not to since they are obviously not the healthiest recipe.

Cholesterol Raising Hashbrowns

2 lb bag frozen Southern-style hashbrown potatoes
2-3 slices of bacon, diced
1/4 cup margarine
1/4 cup vegetable oil
2-3 green onions, sliced

Fry the bacon in a large skillet until almost crisp.

Add margarine and vegetable oil to the skillet and heat until the margarine melts.

Add frozen hashbrowns and green onion.

Cook until potatoes are done (I stir often) and are starting to brown. That depends on taste too because my husband likes them to be brown and crispy. I have to watch him or he will take over cooking these when I am working on them to get them that way.

Enjoy!

Happy cooking.
Reba

Chuck Roast Barbecue

Today I had planned on making poppy seed chicken but at the last minute, we decided to head over to a local "safari"/petting zoo. I knew we would probably be getting back later, so I switched my menu to chuck roast barbecue. I just prepared it before we left, then when we came home, it was in the crockpot cooking away. Yum. (This recipe came from my momma)

Chuck Roast Barbecue

2 1/2 lbs chuck roast (boneless and trimmed)- I rarely can find an actual chuck roast. I just try to find a cut that is similar.
2 onions chopped (Honestly, if I served that much onion, my family would protest...I did like 1/4 of one...that was plenty for us)
1 12. oz can cola (I just get a 16 ounce bottle of Coke, pour 12 ounces in the mixture, then save the rest for those days that I am getting a caffeine headache.)
1/3 cup Worcestershire sauce
1 1/2 tbsp apple cider vinegar OR white vinegar
1 1/2 tsp beef bouillon granules (or one beef bouillon cube)
3/4 tsp dry mustard
3/4 tsp chili powder
1/4 tsp ground red pepper
1/2 tsp garlic powder

1 cup ketchup
hamburger buns

Of course, you know my firs step. The crockpot liner. No, I am not getting anything for mentioning them. I just really like them! Cleanup is SO much easier.

Place roast in slow cooker. Add onion.

Combine cola and the next 7 ingredients. Reserve and chill one cup sauce.

Pour remaining sauce over roast.

Cover and cook on high for 6 hours or low for 9 hours or until roast is tender.

Remove roast/chopped onion from cooker.

Shred meat with two forks.

Combine reserved sauce and ketchup in a saucepan.

Cook over medium heat, stirring constantly.

Pour sauce over shredded meat.

Serve on buns.

We toast our buns (hamburger buns that is) in the oven on warm.

I usually serve these with sweet potato fries. I used to make my own sweet potato fries. Now I buy a bag...Ore Ida I think? They are muy bueno!

Anyway, this is a family favorite...enjoy!

Happy cooking!
Reba

Tuesday, March 22, 2011

Green Bean Bundles


Ask me at any point what my least favorite vegetable is. It is a toss up between okra and green beans. The thought of both turns my stomach. Ick.

However, one night a friend (I think it was my friend Tara) brought some green beans to a church social...green bean bundles. I can't say that I eat them still. However, I can tolerate the smell, and they ALMOST look good to me. They look very good to my husband, so that is why I make them on occasion. They also work well for a potluck.

Green Bean Bundles
2 cans whole green beans
1 package bacon
1/2cup brown sugar
3/4 stick of butter
1/2 tsp garlic powder
dash of pepper

Cut the bacon in half (vertically)

Wrap one half a slice of bacon around five or six green beans (thus the "bundle).

Lay in a glass baking dish.

Melt the butter. Add the brown sugar, the garlic powder, and the dash of pepper.

Pour over the top of the green bean bundles.

Bake at 350 for 30 minutes.

These can easily be made ahead, though if possible, I wouldn't pour the butter mixture until you are ready to cook them, though I have done it the other way too.

So far my hubby is the only one who will touch them.

But with most people (who eat veggies), they are quite popular.

I have seen other recipes that are similar or involve putting bacon on top of the beans but this is definitely my husband's preferred recipe.

Oh, since only one in our family eats them, I often halve the recipe. :)

Enjoy!

Happy cooking!
Reba

Sunday, March 20, 2011

Salsa

Last night was Taco Night at our house. This meal is the ONE meal that nobody complains about. We just put out all the fixings (tortillas AND hard shells, lettuce, avocado, refried beans (I get the fat free), cheese, seasoned ground beef, sour cream, chips, etc, and let everyone create their own. Some prefer no meat while others eat mainly meat. Some love the beans, others won't touch them.

The one thing I always make for Taco Night is salsa. I am REALLY picky about salsa. I know a lot of people love chunky salsa, but I don't. I like mine more in liquid form. No big chunks.

Anyway, several years ago our school media specialist (librarian) brought this salsa to school and I was hooked. Now I just make my own using her recipe.

You need...
1 large can diced tomatoes
1 can Rotel (diced tomatoes and green chilies...regular not mild)
1/4 cup chopped onion (red or purple)
1/2 tsp salt
1 tsp dried cilantro or 2 tsp fresh

Here is how I chop my onion:


I love that thing. It goes together easily and then I just tug on the string a few times and it is chopped for me. Minimal tears. :)

Put all ingredients in a blender and pulse a couple of times until everything is well blended. Don't pulse too much or it will be "mush". :) Refrigerate overnight to blend flavors.

Add more onion or more cilantro (my favorite) to your own taste. I always pour in the cilantro.
Enjoy!
Reba

Saturday, March 19, 2011

Flank Steak

Several years ago, we visited my sister in Kansas. She served me this recipe for the first time and it quickly became a family favorite. We don't have it as often as I would like but when we do, we enjoy it whole-heartedly!

Please disregard the lighting in this pic...it really is much yummier than it photographs.

Flank Steak:
Take a 2 lb flank steak. Score it diagonally on both sides. Rub dry mustard and black pepper into each side. (I have grown to love my "pepper grinder"...it is my new favorite toy.)

Cut the flank steak into strips against the grain (perpendicular).

Place in a shallow bowl or a ziplock bag (that is what I use).

Pour vegetable oil, soy sauce, and chopped green onion over the steak. I have no exact measurement. I just pour until at least part of the steak is covered. :)

Refrigerate overnight.

I usually try to flip my bag around to make sure it all gets the oil marinade. Usually. If I remember.

The next night, grill. I can't tell you how to grill since I have NO clue how to operate the grill. That is my husband's job. Just grill until it looks the way you like it. For us that is very little pink.

Enjoy!

We typically eat ours with black eyed peas, fried potatoes (recipe coming soon), bread (Katie's bread :), and sometimes a salad.

I didn't say it was healthy.

But it sure is yummy!

Happy cooking,
Reba
PS I have prepared it the morning of and it works. But it is much more tender and flavorful if you prepare it the night before.

Thursday, March 17, 2011

Ham Sandwiches

One night I asked my family what the one meal they wanted me to cook that month was as I planned my menu. (I really only plan a week at a time but I was trying to think ahead.) Both Hunter and Maria requested the "Square Sandwiches".

I honestly don't know the real name.

I just know I have had them at baby showers and finally got the recipe from my friend Carrie. I now make them for dinner on occasion and they get gobbled up. Tonight I made two packages...that made 24 sandwiches. I think one growing boy who will remain nameless ate 10 just alone. Yes, 10. (Lauren is the one person who won't touch them due to the mustard on them.)

Throw in some chips and a little fruit, and it makes a pretty good meal.

And the best part? They are easy, easy, easy. Few ingredients. And they can be made ahead of time and refrigerated until ready to be cooked.

So here is the recipe for any ham sandwich lovers you might have in your household...

Ingredients:
1 package of King's Hawaiian Sweet Rolls (I made one package of the sweet rolls, one of the wheat rolls just to pretend to be healthier...)
1 package of deli ham, thin sliced
1 package of Swiss cheese (I only use cheese with holes...I don't trust Swiss Cheese without holes)
1 stick margarine/butter (I do sometimes just use half a stick)
1 tbsp onion flakes/dried chopped onion
1/2 tbsp poppy seed
1/2 tbsp Worcestershire
1 1/2 tbsp mustard (as in the yellow kind you put on hamburgers)

Split the rolls on one side and put half a slice of Swiss cheese (or a whole one if you wish) plus a couple pieces of the deli ham folded inside. I usually put them in an 11 x 7 baking dish.

Melt the butter/margarine. Stir in the onion, poppy, Worcestershire, and mustard all together and pour over the top of the sandwiches.

Bake at 350 for 10 minutes.

Enjoy!


When I make them ahead, I sometimes pour the butter on top and sometimes wait. Depends on the circumstances.

Happy cooking!
Reba

Wednesday, March 16, 2011

Cheese Stuffed Chicken

A few months ago a friend of my mine (Michelle) posted a chicken recipe on her Facebook page. The recipe actually called for creating a cheese mixture to stuff inside of the chicken. But my friend Michelle wisely advised, "You can use Laughing Cow garlic and herb cheese instead."

Oh. Simple. I like simple!

The first time I did this recipe, I used tenderloins. Just for the record, those are way too small to get much cheese inside. :)

So, I strongly advise using chicken breasts.

I just use the big bag of frozen ones (thawed of course). Much cheaper.

Here is the recipe.
Cheese Stuffed Chicken
(The original recipe from myrecipes.com calls it Chicken Breasts Stuffed with Garlic and Herbed Goat Cheese...I just call it cheese stuffed chicken)

Slit one side of the chicken breasts (I use 6 typically). "Stuff" with a wedge of Laughing Cow Garlic and Herb cheese. (You may have to spread it slightly inside the "pocket".) This stuff is "light" which is even better!

Sprinkle (liberally) both sides of the chicken with kosher salt and fresh ground pepper. I have used just plain salt and pepper but will admit, I like the kosher and fresh better.

Heat 2 tsp of olive oil in a large skillet. Brown chicken for 3 minutes on each side. Turn carefully so you don't lose the cheese. :)

Sprinkle the chicken with seasoned bread crumbs. That was not in the original recipe, but several people commented on the original recipe that they liked it better that way and I agree.

Move to the oven and bake at 350 for 20 minutes or until cooked through.Here is the chicken all together in the skillet. I forgot to take a picture once it was plated. :)

Confession...I used to cook them in the skillet then move them to a baking dish for the oven. One day I researched my skillet and found it can go in the oven up to like 450 degrees. Much easier to do it that way. Fewer dishes to clean and it stays in a hot pan. Just remember to use an oven mitt when you grab the handle to take it out!

I really like this chicken. The cheese just gives it the right amount of flavor. Yum.

Everybody here ate it...no complaints.

Oh, I served wild rice, green bean bundles (recipe coming soon), and herbed bread "knots" with it.

Happy cooking!
Reba

Tuesday, March 15, 2011

Sweet and Sour Salad

Just to show you we really do eat green things...

I got this recipe from my friend Katie once upon a time. (Not the same Katie as in Katie Bread :) I had it once and was hooked. However, I tend to rely on bagged salads rather than just making my own. The other night I wanted something to go with our crawfish etouffee and this came to mind. I have been reminded how very much I enjoy it. I will be making it again soon!

Sweet and Sour Salad

Salad-
Romaine Lettuce
4 green onions
1 package Ramen Noodles, crumbled (no seasoning)
1 cup walnuts (pieces)
4 tbsp butter

Dressing-
1/2 cup vegetable or olive oil (I use olive but that is my preference...)
1/2 cup sugar
1/4 cup red wine vinegar
1 1/2 tsp soy sauce
salt and pepper to taste

Melt butter in a skillet. Brown the Ramen Noodles (yes, crunchy...NOT cooked) and the walnuts in the butter.

Cool on a paper towel.

Mix the Romaine lettuce, the green onions (chopped), the noodles and the walnuts.

Mix dressing ingredients.

You can make them both ahead of time but I wouldn't add the dressing until right before you serve it or you could end up with soggy lettuce. :)

The funny thing is that a year ago, none of my kids would have eaten this. However, we were having crawfish etouffee the other night, with caramel pecan brownies for dessert. They all wanted dessert so two of the kids chose to eat salad instead of the etouffee to hopefully have a brownie later (after being told that a few bites of white rice was not sufficient for a dessert...). They wouldn't say it but I think they might have even enjoyed it. Might.

Happy cooking!
Reba

Monday, March 14, 2011

Easy Cheesy Spaghetti

Today was not a nice weather kind of day. It was cool and wet all day long. So we needed something warm and filling for dinner. It seemed like a good Easy Cheesy Spaghetti kind of day.

This meal is pretty easy and can be made ahead. My favorite combination. That being said, I didn't really make it that far ahead this time around.

Easy Cheesy Spaghetti

Take 2 pounds of ground beef (we use 93/7 %). Brown. The original recipe (which came from my dear co-worker Claudia of Baked Potato Soup fame) calls for a chopped onion. I didn't mess with that. Any time I cook ground beef, I throw in some dried minced onion and garlic. It makes it much more bearable to smell when it is cooking. :) Drain the meat.

At the same time, boil water and cook a package of spaghetti. I use whole grain spaghetti. It took me a time or two to get used to the texture but honestly now, I don't like the plain white/flour spaghetti! After cooking it according to package directions, drain the spaghetti.

In a LARGE bowl, mix together spaghetti, ground beef, 2 cans of tomato soup, and 2 cans of cream of mushroom soup (we use the low fat). Pour into a 9 x 13 inch pan. Sprinkle shredded cheddar cheese on top. (We use the 2%) Here is a picture of it half done...

Bake in the oven at 350 for 30 minutes or until "bubbly". Again, I am not a food photographer. I really need to learn some lighting techniques. But trust me, it really is good. All six of us ate it. Joshua alone had three helpings. He told me his favorite parts were the cheese and the "sgetti". I served it with garlic/cheese bread (just frozen). I would have served some leftover salad from last night but I ate that for lunch. :)

This does make a lot so if your family is smaller in numbers, I think you could easily halve the recipe.
Happy cooking!
Reba

Sunday, March 13, 2011

Caramel Pecan Brownies

Not long ago, a friend of mine mentioned caramel brownies on Facebook. That was all I needed to hear. Caramel. Chocolate. How could you go wrong? I asked for the recipe and she told me it was on the back of the caramel balls. I was sitting there thinking, "What on earth is she talking about?"

I dismissed the whole caramel ball thing and decided to google a Caramel Brownie recipe. I found one. It involved the little wrapped caramels. That meant I had to UNWRAP them. Still, I am a big fan of both caramel and chocolate, so I decided to go for it. As I was searching for the caramels, guess what I saw? Caramel Balls! Okay, they are really called Caramel Bits, but they are shaped like balls. They kind of look like little brains in shape. And I am in love. Okay, not really love. But I really really like them. And I could probably eat a whole bag of them on my own...

By the way, I am getting no compensation or kickback from Kraft. I just really like Caramel. Notice. They are unwrapped. That makes it that much quicker to get to them. (Message to Kraft: Feel free to send me free bags of caramels for the free advertising...)

I made these brownies for a fellowship I went to the other night. I got a few bites of them there but then left them for the girls. So tonight when we had our "Cooking Date Night", I thought that might be a good thing to make since the family didn't get any. Then I got grumbles. I had mentioned making Red Velvet Cupcakes. I just didn't think I could do that with all we were making for dinner. Well, the grumbling stopped after the first bites of these brownies. Yum!

Caramel Pecan Brownies

1 package brownie mix
1 package Kraft Caramel Bits
1/3 cup whipping cream
2 cups pecan pieces

Spray a 13 x 9 inch pan generously with cooking spray. The package directions actually say to line the pan with aluminum foil (also sprayed) to lift out later but honestly, I didn't find that necessary this time around. It was less to mess with to just spray the pan directly.

Preheat the oven to 350.

Make the brownie mix according to the package. I used a dark chocolate brownie mix because...well, I just like dark chocolate. Pour half of the brownie mix into the pan and bake for 20 minutes. The package directions say to cover the other half and set aside. Honestly, I covered it and put it in the fridge. Anytime I have used eggs, I get nervous.

After 20 minutes, remove from the oven.

Dump the bag of caramel bits and the 1/3 cup of whipping cream into a microwavable bowl. Microwave for 2 minutes, stirring every 30 seconds. (It only took about a minute and a half tonight) Take the pecans (I like mine pretty fine, so I crushed them with my hand chopper), and pour half of them into the caramel mix. I don't think I truly used as many as the recipe called for. I used a small bag. They are pricey! Pour the caramel mixture over the brownies in the pan.

Next pour the remaining brownie batter over the top of the caramel mix. Since mine was cold from the fridge, I had to help spread it out. I has kind of a marbled look if you use a spatula on the top.

Next sprinkle the remaining nuts over the top and return the pan to the oven for 25 more minutes or until the top is firm.

Let it cool (or it will be really gooey).

I of course ate mine with a little ice cream on the side. :)

Here is a picture though it does not do this dessert justice...the darker part is not burned. That is the dark chocolate. The lighter parts would be the caramel mixture mixed in...Here is a picture of a piece (not cut very straight). Okay, I am not a food photographer. I promise you, it is good stuff. Even my kids who turn up their nose at nuts ate it up.


Tomorrow if I have time, I will share a healthier recipe. Well, kind of. It does involve salad. :)

Happy Cooking,
Reba

Thursday, March 10, 2011

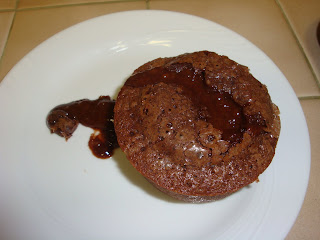
Molten Chocolate Lava Cake

A couple of months ago, a friend of mine posted about this delicious "lava" cake recipe she had found on Pioneer Woman's blog (who attributes the recipe to someone named brandielle who wins my vote for Woman of the Year). I had gotten ramekins for Christmas last year and was just waiting for a reason to use them. As soon as I saw this recipe, I knew it was time. Mmmmmm. That is all I can say. Mmmmmm. They have become a family favorite.

Here is the recipe...mine is for 6 servings. If you click on the link above though, you can put in the number of servings you want and it will change the recipe measurements for you. That is a treat!

Molten Chocolate Lava Cake

  • 6 pieces (squares) Semi-sweet Baking Chocolate...Okay, I use the chips instead. You need 6 ounces. I think they melt much quicker than the squares do.
  • ¾ cups Butter (I use unsalted)
  • 1 ½ cups Powdered Sugar
  • 3 whole Eggs
  • 3 whole Egg Yolks
  • 9 tablespoons Flour
Directions:

Preheat oven to 425 degrees.

Spray 6 custard cups (or ramekins) with cooking spray and place on cookie sheet.

Microwave chocolate and butter in a bowl on high for about 1 minute, until butter is melted. Then stir until chocolate is also melted.

Stir in sugar until well blended.

Whisk in eggs and egg yolks.

Stir in flour.

Divide between cups.

Bake 13-14 minutes until sides are firm and center is soft. Let stand 1 minute.

The original recipe also has you make a cream for the side, but honestly, we are just happy using ice cream instead. I love the contrast of the cold ice cream with the warm cake. I even get the lower fat ice cream which I am sure cancels out the calories of the cake. Well, at least a few. :)

I really cannot say enough about this recipe. It is just...yum. Pure yum. My kids beg for it. I had a neighbor so very sweetly walk over in 24 inches of snow to deliver an egg to us because we were one short and needed this yumminess on yet another snow day at home.

The only bad thing? This recipe is easy. WAY too easy. Makes it really hard to resist making them!


Happy cooking!
Reba

Wednesday, March 9, 2011

Baked Potato Soup

Sorry for the shadow. I am not a professional cook OR photographer.

At the beginning of the week, I noticed that today (Wednesday) was going to be the coldest day of the week. I thought it was a good chance to have one last batch of baked potato soup for "winter". Yes, I am being hopeful that winter is on its way OUT. After all, the groundhog said so...right?

I can take NO credit for this recipe. My co-worker (and a wonderful cook) C. gave me this recipe. It is a family favorite (well, most of us, one child doesn't eat potatoes in any form or fashion). I do not do the onion. I do use low fat sour cream, low fat bacon bits, and 2% cheddar cheese. :) I am sure C. would say I have degraded the recipe with the low fast stuff, but I know if I am going to eat it (and I will), I need to do what I can to cut the calories. Because I rarely let any of this go to waste...just to "waist". :)

Baked Potato Soup
5 large baking potatoes
2/3 cup margarine or butter
2/3 cup flour
6 cups milk
¾ tsp. salt
½ tsp. pepper
12 slices bacon (I use two packs of REAL bacon bits)
1 (8oz.) sour cream
¼ c. shredded cheddar cheese (Okay, I just use a whole bag)
onion

Cook potatoes. Cool. Cut in half, scoop out pulp and set aside. (I have done the potatoes all different ways. I have cooked them in the microwave. I have baked them in the oven. And today for the first time I just scrubbed them, poked them with a fork, then wrapped them in aluminum foil and left them in the crockpot on low all day...they were just fine that way too though not as pretty...their color is a bit different that way)

Melt butter over low heat. Add flour. Stir until smooth. Cook one minute stirring constantly. Gradually add milk. Cook over medium heat, stirring constantly until mixture is thickened and bubbly. Don’t let it burn.

At this point, I put it in the crockpot. You can just cook it on the stove if you want. I like to cook it at my leisure and let it heat all evening.

Add potato pulp, salt, pepper, bacon, and cheese. Cook until heated through; stir in sour cream. Add extra milk for desired thickness. Top with onion (well, I don't), bacon, and cheese. (I usually don't do the "top" part...I am just ready to eat the soup)

Enjoy! My husband likes to eat it with Fritos. I prefer to pair it with a crusty bread dipped in olive oil.

Tomorrow's recipe: Chocolate Lava Cake

Happy Cooking!
Reba

Tuesday, March 8, 2011

Broiled Scallops

The other day when Mark was at a local meat market buying some fresh halibut for our dinner (another entry for another day), I asked him to pick up some scallops. I had just found a recipe in the Dec/Jan 2011 taste of home magazine for scallops, and I couldn't get it off my mind.

Tonight was an "On Your Own" night. We have those on occasion when we have kids going in all different directions. Mark and Lauren were at basketball practice, and Hunter was out with some church friends. That left me with the younger two. "On Your Own" night really just means I am not cooking any set meal. For my younger two, they went the chicken nugget route. (We did have some grapes and cheese too...does that make it any healthier?) For me, I decided the broiled scallops was a way to go.

I personally really liked them. Nobody else in the house even tried them (I didn't have many scallops to begin with). In fact, Lauren came in from practice wrinkling her nose at the smell. So this won't make it on my family menu. But I want to remember it for ME. Just in case some night I need a little treat for ME. :)

Broiled Scallops
Saute 2 green onions and one clove of garlic in 2 tsp of olive oil in a skillet until the onions/garlic are tender.

Add in the scallops. It was supposed to be 12 oz. I think I had less than that. Also add 2 tsp parsley and 1 tsp basil. You are supposed to use fresh ingredients here. The scallops were fresh, but the parsley/basil were not so much. They were dried. But it is what I had, so I went with it. :)

Cook (stirring constantly) over medium heat until the scallops are firm and opaque.

Add 1/4 cup chicken broth, 1/8 tsp salt, and 1/8 tsp white pepper. Okay, honest opinion here, I wouldn't add in the white pepper. I am pretty sure that was what kept burning my mouth and didn't settle well with me (heartburn). I think this would be fine without it...

Cook over medium low heat, uncovered, for one minute.

Put the scallops into an oven proof dish. Sprinkle with 1/5 cup soft bread crumbs (I just chopped up a piece of bread). Dot with 2 tsp butter. (Honestly, I forgot this part and it was just fine without it)

Broil 4-6 inches from the heat until the bread crumbs are golden brown.

I made a single serving for me, and added in a cup of rice.

Yum.

Sunday, March 6, 2011

Bacon Wrapped Smokies

This recipe came from my sister. I am not totally positive this is the official name but honestly I am too tired to walk into the kitchen to check. So we will go with it and I will edit if necessary. :) My sister makes this for our appetizer day (we have one every Thanksgiving or Christmas, depending on which holiday we are together) and they disappear quickly. I made them tonight for our life group, so I thought I would share the recipe. Easy, easy, easy.

Bacon Wrapped Smokies
Take one package of Lil Smokies
1 package of bacon, cut in half (okay, it took a little more than a package for me...)
1 cup of brown sugar

Line a 9 x 13 inch pan with aluminum foil.

Wrap each Lil Smokie with a piece of bacon.

Pour the cup of brown sugar over the top...yes, it is alot but trust me, it is worth it.

Bake at 400 degrees for 20-25 minutes (I actually did it about 30 tonight just to keep them hot).

Enjoy.

Really, it is that easy.

And oh so yummy!

Happy cooking!
Reba

Saturday, March 5, 2011

Katie Bread

I call this Katie bread because the person who gave me the recipe is named Katie. :) We all call it that at school. I honestly don't know the real name. We just know if we have any kind of potluck, we will get the pleasure of Katie bread. And if you don't hurry up and get it first thing in the morning, it will be gone by 10.

I like to make it on occasion at home, though only one other person in the family will eat it (that would be Joshua). Well, Maria will occasionally. So I have started making "half and half". Half with cheese and half without.

Here is how you make it:
Katie Bread

Take one loaf of French bread. This time I used wheat French bread. So the picture is not nearly as pretty as it could be. The regular French bread is prettier...just not as healthy. :)

Split the French bread in half (as in on the "side").

Melt butter (I used a stick and it was more than enough) to spread over the bread.

Mix together mayonnaise and Pepperjack cheese (I use the bag of already shredded pepperjack). I don't have exact measurements...I just mix some and if it isn't enough, I mix more.

Then spread it on top of the bread.

Unless you live in my family.

Then you spread it on half the bread, and just leave butter on the other half.

Then bake at 275 degrees for 25 minutes (give or take).

Unfortunately, since I was making fingerling potatoes at the same time, I had it in a warmer oven, so this bread got darker than it should have. It sure was good though. I just wish I had better pics.

Enjoy!


Roasted Fingerling Potatoes with Garlic and Thyme

Just a few weeks ago, Mark and I decided to celebrate Valentine's Day at home. I had parent/teacher conferences that evening, so we were going to have a late dinner. We had already settled on steaks, I just needed a good, easy potato dish to go with it. And quick. As I perused the produce department, I discovered a bag of fingerling potatoes. I don't know that I have ever eaten them but I have seen them on menus at restaurants. Even better, there was a recipe on the back of the bag. Perfect! Quick and easy.

Somehow I didn't realize that this would be such a colorful bag of potatoes. I was a bit surprised when I started washing the potatoes, especially on the purple ones. And the green ones...since I tend to be leery of green potatoes.

Having made them twice now, I can say they will be in our regular rotation. They are fun to look at and yummy to eat. And they cook quickly. I am all for quick.

This is the recipe I used (straight from the bag) with a few of my sidenotes...

Roasted Fingerling Potatoes with Garlic and Thyme
1 1/2 pounds Fingerling Potatoes (the brand I used was Melissa's) It says cut into bite size pieces, but honestly, they are so little (making them hard to scrub) that I didn't cut them at all.

2 Tbsp olive oil (it calls for extra virgin, I just used the olive oil I had)

1 tsp freshly ground black pepper (this was new for us...we have always used plain black pepper. There is something very chef-like though of grounding my own with the help of the dispenser of course :)

18 cloves of garlic, chopped. Okay, 18 seems excessive to me. And I am a garlic fan. I just used the cloves from one head, clove, bulb of garlic...whatever you want to call it. I thought that was plenty.

6 sprigs of fresh thyme, minced- The first time I made them, I found a package of a "single serving" of thyme. This time I couldn't find it, so I just sprinkled dried thyme on it. I prefer the fresh. I just don't want to buy a whole big bunch of it.

Preheat oven to 425 degrees.

Combine all of the ingredients in a baking dish and mix well.

Bake (uncovered) for about 10-15 minutes or until potatoes are browned and tender. Stir once or twice during cooking.

I actually cooked them for closer to 30 minutes to make sure they were all tender. Some colors cook faster than others.

Enjoy.

My kids were skeptical about the colors but they ended up liking them (all except the one die hard anti potato eater).

I love them. Yum.

Enjoy!

Happy cooking,
Reba

Thursday, March 3, 2011

Fall Pork Tenderloin

I just really started using my crockpot in the last two years. Now I wonder how I survived without it. Well, at least made dinner without it. I probably would survive.

Anyway, I think I got this recipe last year from a co-worker. "A" gives me good recipes. :) This is easy and yummy, my favorite combination.

My first essential for this recipe is the Reynold's Crock Pot Liner. I am not in any way getting kickbacks from Reynold's. I just love those bags. I am more likely to use my crockpot because of these.

Take a 2 pound pork tenderloin and place it in the crockpot.

Pour 1 can of cranberry sauce and 3 cups of apple juice (I use the 100 percent juice kind). Sprinkle 3/4 tsp of salt and 1/2 tsp of black pepper over the tenderloin.

Cook on low for 6-8 hours.

Yes, that is it.

I ran home during my activity period (mid day) to throw it all in the crockpot and get it cooking. By the time I got home, our whole house smelled like fall pork tenderloin. And my stomach started growling.

The only way to describe it is a perfect combination of salty and sweet. Yum.

Thanks to "A" for the recipe.

Here is a picture of the pork still in the crockpot. I just pull it out of the juices when we are ready to eat it.

Tonight's side dishes included fingerling potatoes, cheesy bread, and black-eyed peas. I will be sharing a couple of those other recipes
Did I mention that I am not a professional food photographer?

More soon!
Happy cooking!
Reba
Postnote: Just started counting calories this past month. This dish is one of the lower calorie meals I make! I think I may be making it even more often...

Wednesday, March 2, 2011

Lasagna in a Bun

Some time in the last year I found this recipe in a magazine. I want to give credit to the right one but I am not positive which one it was...Taste of Home maybe? If I google "Lasagna in a Bun", I can find it in different places on the web, so I am thinking it is not a top secret recipe. Anyway, it is one of my new favorites. I seriously could eat the whole pan if I let myself. I don't for weight purposes plus that whole family I need to feed, but I could. It is one of the few meals that all kids will eat, even my semi-vegetarian preschool son. :)

Lasagna in a Bun

First thing you need: Hoagie buns (8 to be exact). I get mine from the bakery area at our grocery store if they aren't out of stock. I have also found them with the loaves of bread. However not all hoagie buns are created the same. Don't get split buns. You need just whole hoagies.

So you take the hoagie buns and use a knife to cut an oval around the top of the bun. Then "dig out" the middle section, leaving a quarter inch or so all over. It will look kind of like a little canoe.

I have been asked what I do with all of the leftover bread. I sometimes just throw it out, sometimes (like tonight) I bag it up to take it to the "duck park" with the kids to feed the ducks. I am sure there are some other uses for it like making bread crumbs or croutons. I was just too tired tonight to get really creative.

Brown one pound of ground beef. I used 1 1/2 pounds just to make the sandwiches a bit more filling. I worked on the buns while my meat was cooking.

Once the beef is browned and drained, mix in one cup of spaghetti sauce (I use more like one and a half cups since I use more meat), one tablespoon of garlic powder, and one tablespoon Italian seasoning. By the way, that is one of my favorite seasonings. Yum.

Spoon the beef into the hoagie "boats" (which should be on a large cookie sheet).

Next, mix 1 cup ricotta cheese (I use the part skim), 1/4 cup shredded Parmesan (favorite cheese of mine), 1/2 cup of Mozzarella, and 1/2 cup Cheddar (I use low fat on any cheese I can). Top the meat filling with the cheese.

Loosely cover with foil and bake for 20-25 minutes at 350. Take the pan out of the oven. Mix together 1/4 cup of both Mozzarella and Cheddar and sprinkle on top. Return to the oven for just a couple more minutes to melt. Then enjoy.

I didn't involve the kids tonight due to time constraints, but it would be a fun recipe to cook with kids.

Oh, these do reheat well.

This will be on my Teacher Appreciation Menu this year since it is easy to make ahead...

And yes, I know it is called Lasagna in a Bun but there are no noodles actually involved. :)

Happy cooking!
Reba

Print version:

Ingredients

8 sub or hoagie buns

1 pound ground beef (because of the size of our family, I used two)

1 cup spaghetti sauce (I doubled due to beef amount)

1 tbsp garlic powder

1 tbsp dried Italian seasoning (it ended up being one of my favorite parts!)

1 cup ricotta cheese (I did use light)

1/4 cup grated Parmesan (I used shredded...it is a favorite of mine)

1 cup shredded cheddar cheese (I used 2%)

1 cup shredded mozzarella (I use the part skim kind)


Directions

1. Cut an "oval" around the tops of the buns. Hollow out centers, leaving 1/4 inch thick shell. Discard tops and centers or save. We are going to visit the duck park with ours. :)

2. Brown ground beef, drain.

3. Add spaghetti sauce, garlic powder, and Italian seasoning to ground beef in a skillet.

4. Cook 4-5 minutes until heated through.

5. Meanwhile, combine ricotta, Parmesan, and half of cheddar and Mozzarella cheese. Mix well.

6. Spoon meat sauce into buns; top with cheese mixture.

7. Place on a baking sheet. Cover loosely with foil.

8. Bake at 350 for 20-25 minutes. Uncover, sprinkle with remaining cheeses. Return to the oven for 2-3 minutes until the cheese melts.